The Firepower SSL Decryption feature allows you to block encrypted traffic without inspection or inspect encrypted that would otherwise be unable to be inspected. In order for the FTD to decrypt the traffic the FTD must resign all certificates of websites, this is achieved by a Man in the Middle (MITM) attack. An internal CA must be used to issue a certificate using the Subordinate Certificate Authority template; Firepower will then dynamically create a certificate on the fly (spoofing the real certificate) thus allowing for decryption and inspection of the website. The client computer must trust the Internal CA so as not to receive any certificate errors.
In this scenario an FTD v6.2.2 is acting as the gateway that will decrypt the traffic, all configuration will be made on the FMC v6.2.2.
Firepower Certificate
- On the FMC navigate to Objects > Objects Management > PKI > Internal CAs
- Click Generate CA
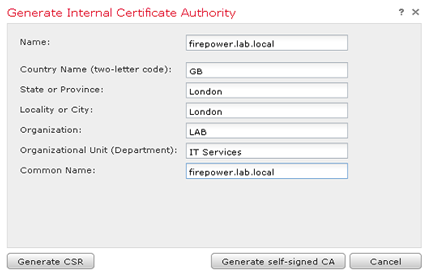
- Fill out the information
- Click Generate CSR
- Copy the CSR request content

- Navigate to the Certificate Authority (in this instance we are using Microsoft CA)
- Click Request a certificate

- Click advanced certificate request

- Paste the CSR into the Saved Request box
- From the Certificate Template drop-down box select Subordinate Certification Authority

- Click Submit
- Select Base 64 encoded and download the signed certificate (save somewhere to import later)

- Return to the FMC GUI and navigate to Objects > Objects Management > PKI > Internal CAs
- Edit the CA object previously created

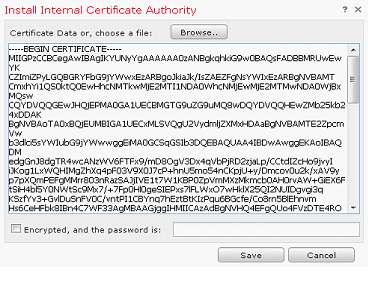
- Click Install Certificate

- Click Browse and select the downloaded signed certificate
- Click Save
- If imported correctly the output will confirm

SSL Policy
For demonstration purposes in this example SSL Policy we will create 3 SSL rules: – Block insecure certificates (self signed, revoked and expired), Decrypt using DN and Decrypt using Application
- On the FMC navigate to Policies > Access Control > SSL
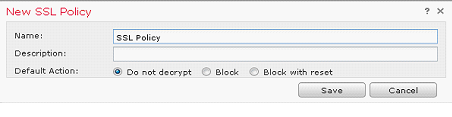
- Click Add a new policy
- Click Add Rule
- Enter a descriptive name e.g Insecure
- From the Action drop down list select Block with reset
- Click the Cert Status tab
- Select the certificate status to block:- revoked, self
signed and expired - Click Logging and enable Log at End of Connection
- Click Save

- Click Add Rule
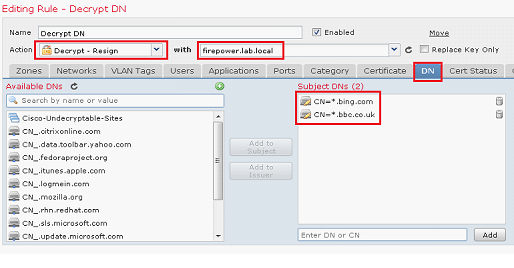
- Enter a descriptive name
- From the Action drop down list select Decrypt – Resign
- Select the certificate to use
- Click the DN tab
- Enter a wildcard DN for websites to decrypt
- Click Logging and enable Log at End of Connection
- Click Save
- Click Add Rule
- From the Action drop down list select Decrypt – Resign
- Select the certificate to use
- Click the Applications tab
- Select the applications – in this instance we will block Google and Yahoo! Applications
- Click Logging and enable Log at End of Connection
- Click Save

- Ensure the default action is Do not decrypt

Access Control Policy
The SSL Policy must be referenced in the Access Control Policy that is applied to the FTD.
- Navigate to Policies > Access Control > Access Control
- Select the ACP applied to the FTD
- Click the Advanced tab
- Edit the SSL Policy Settings
- From the drop-down list select the previously created SSL Policy

Once the SSL Policy has been attached to the Access Control Policy the Policy can be deployed to the FTD.